Knock-Off Anthropologie Metal Flowers
29 April
When I shared my knock-off Anthropologie vases, I promised to share how to make the metal flowers that I had displayed in one of the vases.
Supplies Needed
Cut out some leaves. One or two leaves per flower will be enough.

Normally I would say to go light with the spray paint, but here I want you to really layer it on thick! You want it to pool up around the center of the flower where the nuts are glued on. It helps to disguise the area where they are joined together.
Next, take the white spray paint and do just a super fine, light mist around the very edges of the flowers.
I think these would be really pretty added to a wreath too! You could leave off the stems and leaves and just make a bunch of flowers and add them around a wreath for spring.
They are also an Anthro product but I'm sharing how to make a knock-off of these too!
If you missed the vase project, be sure to check that out. I shared how to easily make beautiful colored glass vases very similar to those that are for sale on Anthropologie's Terrain site. You can see that post here:
Read on if you want to learn how to make some beautiful metal daffodil flowers similar to Anthro's.
Knock-Off Anthropologie Metal Flowers
Supplies Needed
- Tin beverage cans (1 large beverage can will make 1 flower)
- Various nuts and washers to create the flower center (these "keep lock nuts" work great or you can stack various kinds)
- Scissors
- Needle nose pliers
- Industrial glue (I used E-6000)
- Clamps in a variety of sizes
- Spray paint (yellow, green, and white)
- Craft paint (yellow, white, and brown)
- Crop-a-dile hole punch and eyelet setter (optional)
Step 1 - Cut open the beverage cans
Cut the beverage cans down one side and then cut off the top and bottom. I didn't think that the tin from a regular beverage can (beer can or pop can) was very sharp but it's probably best practice to wear gloves during this step.
Flatten the can by rubbing it over the edge of a table in the opposite direction of the curve so that you are left with a flat piece of tin from which you can cut the flower petals.
Step 2 - Cut flower petals and leaves
You can make a cardboard template for your flower petals or draw them freehand.
For these flowers, the petals are a group of three together in a clover shape. An easy way to get this shape is to draw three teardrops, connecting the points.
Trace or draw two sets of these petals onto the tin (I found a pencil worked best for tracing onto the tin) and cut them out. You will use two sets of petals to make one flower. Leave room on the tin to cut some leaves too!
Step 3 - Punch the petals and Crease the pieces
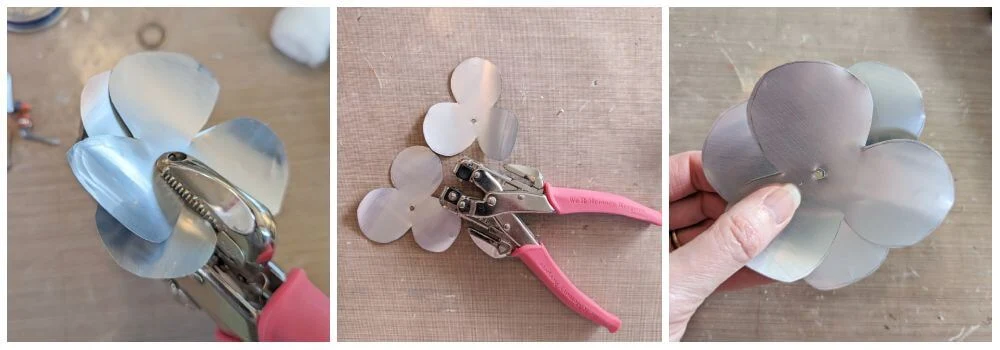
Layer the two sets of petals on top of each other and punch a hole through the center. I used a crop-a-dile hole punch for this but an awl or even a pair of scissors should work.
By the way, I HIGHLY recommend adding a crop-a-dile to your craft supplies. It will punch through almost anything... paper, thin and thick metal, cardboard, etc.
Fold the petals and leaves in half and then open them back up to crease them. Refer to the pictures below and just crease each petal and leaf about halfway.
Step 4 - Create the flower center
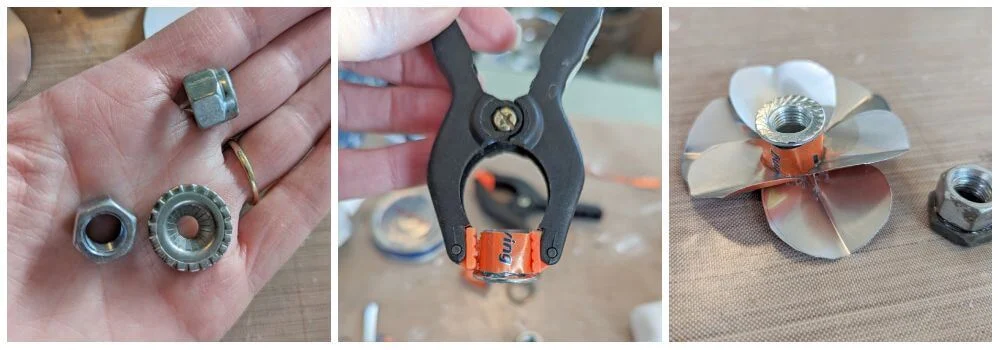
You can use a variety of nuts and washers to create the flower centers. For some of my flowers, I also cut a strip of tin from the can and wrapped it around the nut.
NOTE: Use E6000 (or other industrial-strength glue) for gluing all of the flower parts.
Glue the nuts and washers together if needed and wrap the tin around and glue that, use clamps to hold it tightly.
Step 5 - Create the flower stamen
The flower stamen are the little pieces inside the very center of a flower.
To create these, cut some skinny strips from the tin can. Wrap them around the end of a pair of needlenose pliers or another small, round object to create little curls. Leave the ends straight.
Step 6 - Assemble the flower
You will do step 6 in two parts. In part A, you will glue the flower together and the leaves to the stem. In part B, you will glue the stamen into the flower center and add the stem.
Part A - Glue the flower together
Cut a length of wire however long you want the flower stem to be. I made two flowers and cut the wires long so that I could wrap them all together at the bottom and form a loop.
Stack and glue the two sets of flower petals together and clamp them. Glue the leaves to the wire and clamp them. Glue the flower center you created above to the center of the petals.
Let this all dry for 24 hours.
Part B - Add the stamen and stem
Remove the clamps. Insert the curly stamen pieces you made into the center of the flower. Stick the straight ends through the hole in the center of the flower and bend them toward the back of the flower.
Flip the flower over and put a dollop of glue right below the hole. Add the stem into the dollop of glue. Cut two small pieces of tin from the can and lay them over the top of the glue catching the stem and the flat ends of the stamen underneath. This will help keep everything secure once it all dries.
Clamp the ends of the piece of tin and let this dry for another 24 hours.

Step 7 - Paint the flower
If you have made more than one flower, go ahead and twist the wires together and arrange the flowers roughly how you would like them. It helps to do this before painting them so that you won't scratch the paint off when you try to arrange them later.
Spray paint the flowers using yellow for the flower and green for the stems and leaves.
I did not show a picture, but I used a piece of cardboard to shield the flowers when I was painting the stems and vice-versa.
This step of painting the flowers does not need to be perfect because we will be going in with paint brushes and craft paint to finish these up so you can cover up imperfections then.
To do this, hold the can of spray paint about 3 feet away and make quick, sweeping motions (practice on cardboard first).
Step 8 - Add the painted details
You will add the painted details with yellow, white, and brown craft paint.
I made a video to show this part of the project.
Step 9 - Display and enjoy!
Put these in a pretty vase and enjoy!
Posted by: Tania | Little Vintage Cottage
at 29 April
Tag:
DIY & Crafts


.jpg)


.jpg)
.jpg)

.jpg)
.jpg)
.jpg)


These turned out so cute! I remember these were popular in the 1960s and, although we did crafts then, I don't remember anyone trying to make them. I enjoyed your video and loved the music. Great job!
ReplyDeleteThanks Vikki! I seem to remember tin can flowers back in the day :)
DeleteI like yours better than the Anthro version! They're so pretty! Great project.
ReplyDeleteThank you!
DeleteYour flowers look amazing Tania! You would never guess they started as a tin can. They have a real vintage vibe to them.
ReplyDeleteThank you!
DeleteSmokes... these tin can flowers are incredible! You sure nailed this Anthro knock-off, Tania! The details are stunning!
ReplyDeleteI am pretty proud of them, thank you Donna!
DeleteThank you so much for posting. I think there are many variations that can be done once I can see the big picture. Crafty and frugal. One of the best things I have seen in years.
ReplyDeleteThank you Cannie! Yes, I was imagining all the different flowers one could make when I was working on these!
Delete