DIY Open Shelving in the Kitchen
30 September
Now that I am finally done with the major cleaning (it took me about 2 hours to clean each bathroom... so gross) I have started on some projects around the 2nd avenue cottage that are a little more fun! :o)

Today I want to show you my kitchen cupboard turned open storage! You may remember this picture. Doesn't look half bad right?! WRONG! Oh the filth and grime that hid within those innocent looking cabinets!
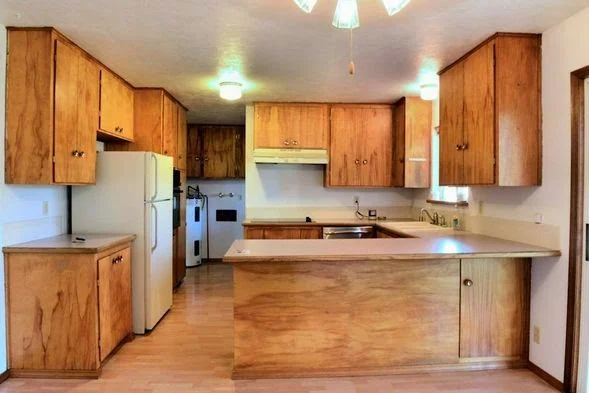
Anyway, the cabinet that I have now turned into open shelving is the one on the top right. Here it is all scrubbed clean (even though it doesn't look like it), holes filled and sanded (thanks mom!)

And here is the after! Now let me show you how I did it! Pretty easy actually. But if you scroll up to that before shot you'll see that these cabinets are actually pretty cheap, my mom thinks they may be home made. The shelves are plywood which means the edges show all the layers that make up a piece of plywood... they are rough and filled with gaps and some ugly black something... old glue I think.

So I went down to my local Home Depot and picked out some wooden trim and had them cut it to size. It came in an 8' length and only took one piece to have enough for the two shelves in my cabinet with a little left over for some other project!

I just used construction adhesive to attach them to the shelf edges. You could nail them too but all my tools are still in storage and this is mostly going to be a display shelf so it should be fine.

I used tape to hold the pieces of trim in place while the glue dried.

 And then I painted the cabinet with two coats of Olympic One brand paint. It is paint and primer in one and scrubbable so perfect for kitchen cupboards! I used a small foam roller made specifically for cabinets and doors and it worked great! While the color looks white it is actually called Arctic Cotton and is the lightest of light greige... very compatible with my Olive Grey accent wall.
I'm going to use the same Arctic Cotton color on the rest of the kitchen upper cabinets and have chosen a couple shades darker for the base cabinets (Slate Pebble).

I painted the backs of the shelves with the Olive Grey accent wall color. It really makes the dishes pop!

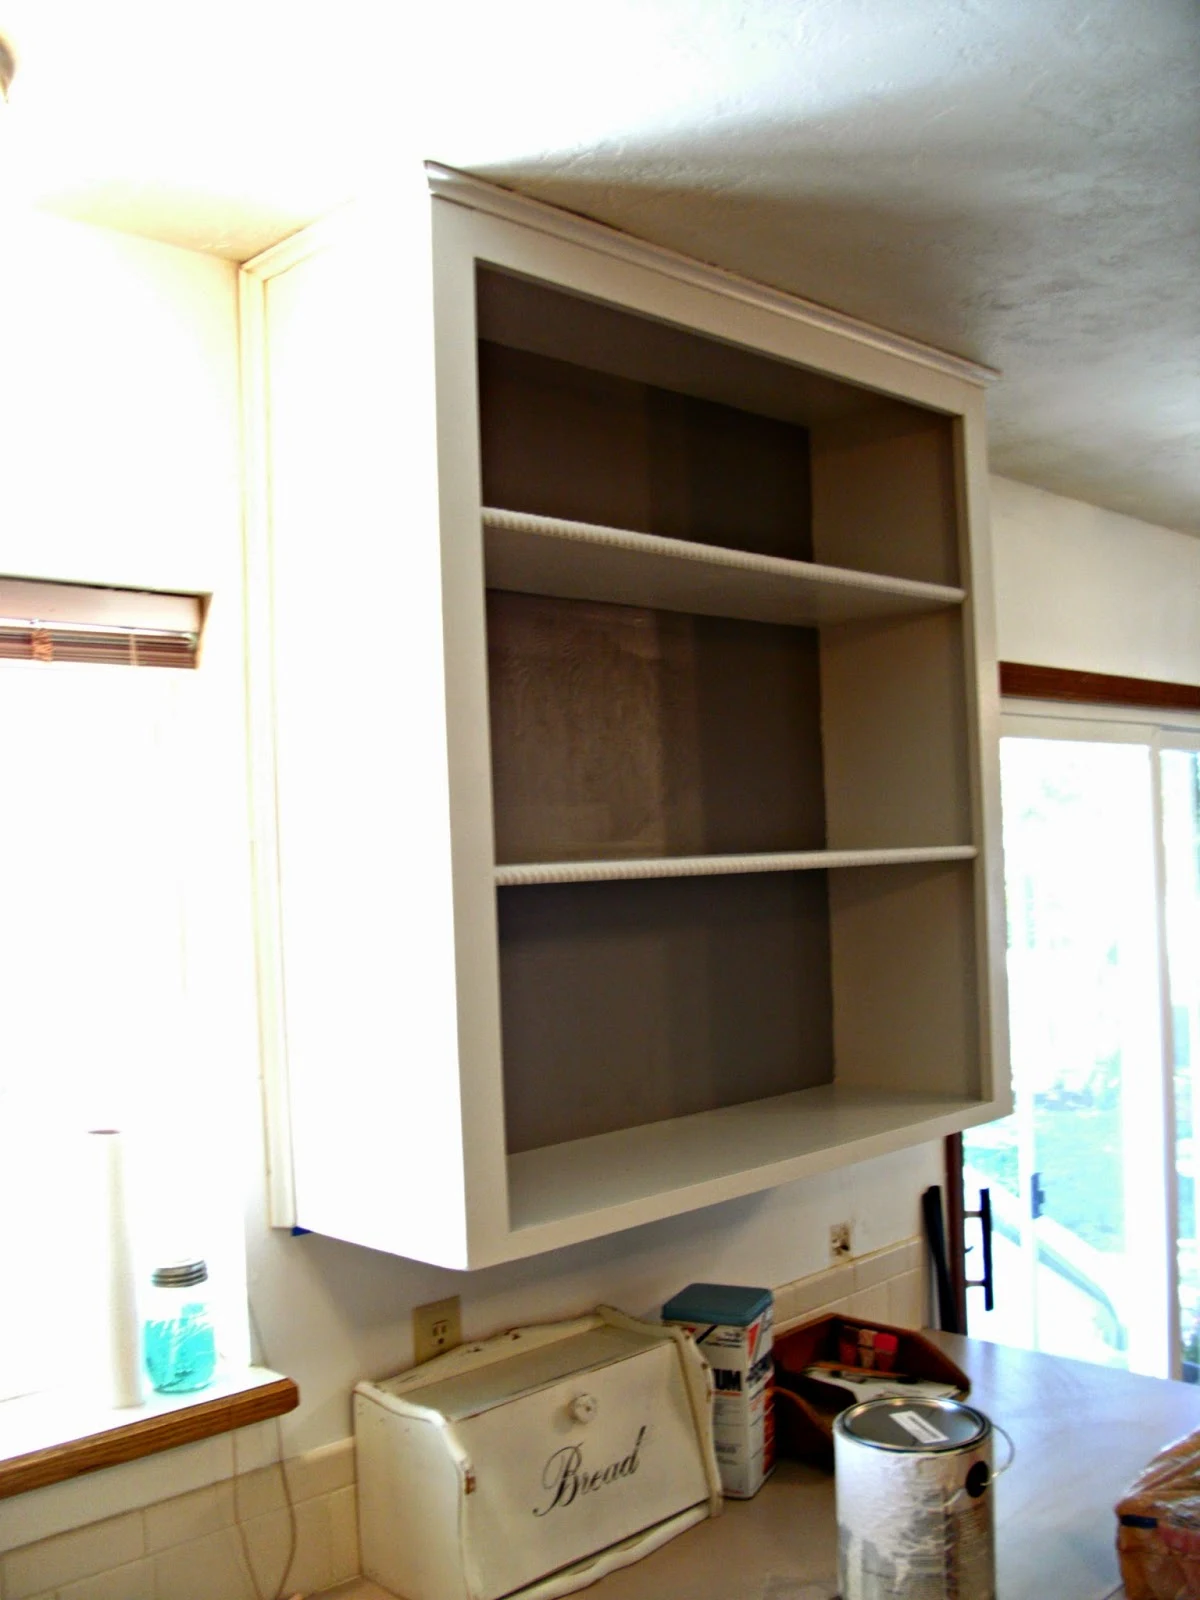
Here it is all filled up with my white dishes!

I still need to caulk around the outside edges of the cabinet to make it blend even better and I'd like to find some corbels/chunky shelf brackets to put underneath it.

I have another, larger pitcher that I have not found yet for that top shelf. The plate in the background was my grandma's from her very first waitress job. She carried it with her all those years and now it's mine, I will cherish it forever :o)

Other than this and a few other projects it has still been a flurry of activity around here. Electricians, plumbers, inspectors... electrician again to fix what the inspector called out... inspector again to check on the electrician... fencing guys, etc., etc. Whew! I think that's all over now.
Hope everyone is having a great week, I am having a blast! :o)


Today I want to show you my kitchen cupboard turned open storage! You may remember this picture. Doesn't look half bad right?! WRONG! Oh the filth and grime that hid within those innocent looking cabinets!

Anyway, the cabinet that I have now turned into open shelving is the one on the top right. Here it is all scrubbed clean (even though it doesn't look like it), holes filled and sanded (thanks mom!)

And here is the after! Now let me show you how I did it! Pretty easy actually. But if you scroll up to that before shot you'll see that these cabinets are actually pretty cheap, my mom thinks they may be home made. The shelves are plywood which means the edges show all the layers that make up a piece of plywood... they are rough and filled with gaps and some ugly black something... old glue I think.

So I went down to my local Home Depot and picked out some wooden trim and had them cut it to size. It came in an 8' length and only took one piece to have enough for the two shelves in my cabinet with a little left over for some other project!

I just used construction adhesive to attach them to the shelf edges. You could nail them too but all my tools are still in storage and this is mostly going to be a display shelf so it should be fine.

I used tape to hold the pieces of trim in place while the glue dried.


I'm going to use the same Arctic Cotton color on the rest of the kitchen upper cabinets and have chosen a couple shades darker for the base cabinets (Slate Pebble).

I painted the backs of the shelves with the Olive Grey accent wall color. It really makes the dishes pop!


Here it is all filled up with my white dishes!

I still need to caulk around the outside edges of the cabinet to make it blend even better and I'd like to find some corbels/chunky shelf brackets to put underneath it.

I have another, larger pitcher that I have not found yet for that top shelf. The plate in the background was my grandma's from her very first waitress job. She carried it with her all those years and now it's mine, I will cherish it forever :o)

Other than this and a few other projects it has still been a flurry of activity around here. Electricians, plumbers, inspectors... electrician again to fix what the inspector called out... inspector again to check on the electrician... fencing guys, etc., etc. Whew! I think that's all over now.
Hope everyone is having a great week, I am having a blast! :o)
Posted by: Tania | Little Vintage Cottage
at 30 September
Tag:
home decor


Everything looks wonderful. You have accomplished so much. Love the colors.
ReplyDeleteIt's looking good! Amazing what a difference a little paint and some decoration makes!
ReplyDeleteYou are making progress... I can so relate when I moved in to my house it was filthy.. I wouldn't even sleep in my bedroom for at least 2 weeks till I cleaned and painted. How do people live like that? I love your open cabinet and the dishes do pop. Paint can transform into miracles. Thanks for stopping by and liking my Harriet Hoosier cabinet.
ReplyDeleteOh my goodness...you have made a lot of progress in just a week! I am loving the greige wall and the industrial shelving. I think I NEED some of those in my craft room! I love everything you have done so far and can't wait to see more! Have fun...:)
ReplyDeleteI absolutely love what you did! What a difference. Well done
ReplyDeletesuper super cute...lovin the shelf. You have been super busy!!!!
ReplyDeleteLOVE the open cabinet! Genius!
ReplyDelete