Half Bath Redo - Demo & New Vanity!
02 August
I'm back with an update on my half bath redo... I know, finally! right?! I posted the before pictures here: Half Bath Redo - Before Pictures, you may want to go back and refresh your memory of what it looks like... don't worry, I'll wait for you!

So let's see that demo! This is my first real demo in my house... where I got to rip, break, tear, and just make a big ol' mess!

I started with the tile back-splash around the sink area.

Then I called in a friend to help. We took down the ugly corner cabinet.

Next we took out the sink and started on the counter top and vanity.

Everything was taken out except the toilet and floor!

You can see the old 60's linoleum where the vanity was.

That hole in the wall with the coat stuck in it was actually like that when I bought the house. No one saw it during the walk through because the counter kind of covered it up. It's access to the tub plumbing for the main bathroom on the other side of the wall so I'll probably leave the hole but just cover it somehow so it can still be accessed.

Now it was time to get started on reconstructing my bathroom!
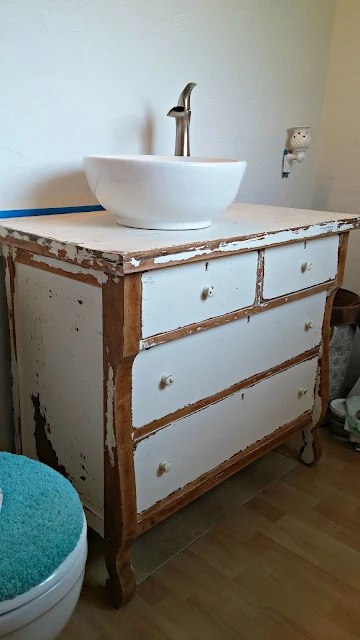
I had this vintage dresser that as you can see, I was using for my TV stand but I really wanted to create a bathroom vanity with it!

First thing I did was take it outside and sand it... well actually the first thing I did was figure out something else to hold my TV! Then I sanded the dresser... :o)
There were some areas where the paint had scraped off already so my plan was to just distress it a bit more...
But then the paint started doing this...

It was balling up and peeling off in big strips! Oh NO! Well... in my normal fashion I just decided to pretend it wasn't happening and go with it! ha ha! It works for me most of the time! And this was no exception.
I sanded until it stopped peeling off and then stepped back to take a look and I LOVED IT!!!

I love how the paint came off almost completely all around the drawers!


So together the faucet and sink came to $179.00.

As usual with my projects that I'm not 100% confident doing myself I called in my dad to help :o)
So you can see we only had to drill a small hole in the dresser for the sink drain!

And you can also see that with the pipes hanging down I was going to have to do some modifications to the drawers!

This dresser is so old that the bottoms of the drawers just slid out!

I cut the bottoms and the sides as needed...

slid the drawer bottoms back in and then flipped the sides that I had cut out upside down and reused them!

Glue, nails, and clamps and badda-bing we have new modified drawers that fit around the pipes under the sink!

But they weren't very pretty on the inside... we can't have that!!

I found this chevron contact paper at Fred Meyer and covered the bottoms of the drawers.

And then I stenciled the sides of the drawers for a little fun accent!


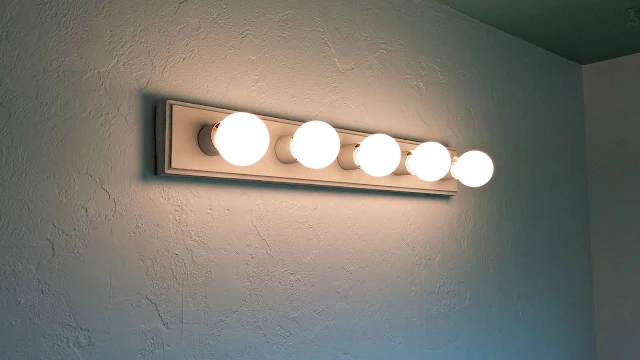
I wanted to replace the light fixture too...

But since I had spent more than expected on the sink and faucet my budget would not allow it at this time so I decided to try painting it instead.

It was just ugly... oak and gold... eww... but I really liked the light it put out.

I'm really glad I decided to try painting it because I'm kinda diggin' the way it turned out!

I used this spray paint in grey: Krylon K04102000 Chalky Finish Spray Paint . This paint is a little more expensive than most... but it's chalk paint!... in a can!! And it's SO nice and so far I've been able to get a few small projects out of one can!
So that's it for now! Oh... I also patched the walls where the tile had been ripped off and filled all the nail holes and painted, I'll show that more in the next bathroom redo update!
I'm really happy with how it is turning out so far! What do you think?


So let's see that demo! This is my first real demo in my house... where I got to rip, break, tear, and just make a big ol' mess!

I started with the tile back-splash around the sink area.

Then I called in a friend to help. We took down the ugly corner cabinet.

Next we took out the sink and started on the counter top and vanity.

Everything was taken out except the toilet and floor!

You can see the old 60's linoleum where the vanity was.

That hole in the wall with the coat stuck in it was actually like that when I bought the house. No one saw it during the walk through because the counter kind of covered it up. It's access to the tub plumbing for the main bathroom on the other side of the wall so I'll probably leave the hole but just cover it somehow so it can still be accessed.

Now it was time to get started on reconstructing my bathroom!
I had this vintage dresser that as you can see, I was using for my TV stand but I really wanted to create a bathroom vanity with it!

First thing I did was take it outside and sand it... well actually the first thing I did was figure out something else to hold my TV! Then I sanded the dresser... :o)
There were some areas where the paint had scraped off already so my plan was to just distress it a bit more...
But then the paint started doing this...

It was balling up and peeling off in big strips! Oh NO! Well... in my normal fashion I just decided to pretend it wasn't happening and go with it! ha ha! It works for me most of the time! And this was no exception.
I sanded until it stopped peeling off and then stepped back to take a look and I LOVED IT!!!

I love how the paint came off almost completely all around the drawers!


I chose this white vessel sink from Lowes. I loved the look but I also thought it would be easier to install in the dresser and would leave more drawer space available.
And I got this faucet from the clearance section. You can see it was reduced from $159 down to $149, then down to $100 and then I wheeled and dealed and batted my eyelashes and got them to take it down to $80! :o)

So together the faucet and sink came to $179.00.

As usual with my projects that I'm not 100% confident doing myself I called in my dad to help :o)
So you can see we only had to drill a small hole in the dresser for the sink drain!

And you can also see that with the pipes hanging down I was going to have to do some modifications to the drawers!

This dresser is so old that the bottoms of the drawers just slid out!

I cut the bottoms and the sides as needed...

slid the drawer bottoms back in and then flipped the sides that I had cut out upside down and reused them!

Glue, nails, and clamps and badda-bing we have new modified drawers that fit around the pipes under the sink!

But they weren't very pretty on the inside... we can't have that!!

I found this chevron contact paper at Fred Meyer and covered the bottoms of the drawers.

And then I stenciled the sides of the drawers for a little fun accent!


I wanted to replace the light fixture too...

But since I had spent more than expected on the sink and faucet my budget would not allow it at this time so I decided to try painting it instead.

It was just ugly... oak and gold... eww... but I really liked the light it put out.

I'm really glad I decided to try painting it because I'm kinda diggin' the way it turned out!

I used this spray paint in grey: Krylon K04102000 Chalky Finish Spray Paint

So that's it for now! Oh... I also patched the walls where the tile had been ripped off and filled all the nail holes and painted, I'll show that more in the next bathroom redo update!
I'm really happy with how it is turning out so far! What do you think?
Posted by: Tania | Little Vintage Cottage
at 02 August
Tag:
home decor


The vanity turned out so great. I love the vessel sink on it. Clever transformation of the light strip!
ReplyDeleteIt's looking good! We, too, notched and modified the drawers in our buffet turned vanity- still gives us usable drawer space! I like your extra color on the sides and the contact paper inside. Very pretty! Looking forward to seeing the rest. Great job!
ReplyDeleteLooks awesome! Can't wait to see the new backsplash. And what you do with the fabric you showed me! Mom.
ReplyDeleteLove the dresser with the .
ReplyDeleteThank you Sharon.
DeleteTania
It looks awesome! I love everything you did. The dresser turned vanity is my favorite and the vessel sink is perfect on it! Great idea modifying the drawers. You still have plenty of storage. The light fixture looks great too! Can't wait to see more!
ReplyDeleteI have to confess when you sanded the dresser and said you loved it I wasn't so sure, but you have such vision and once again you did not disappoint. I LOVE IT too! The sink and faucet really make it and the stenciling and liner is perfect. The light turned out great too. I am so freaking impressed!! Can't wait to see what you do next. So exciting.
ReplyDeleteAww, thank you so much, you're so sweet :o) I'm glad I could sway your opinion on the dresser.
DeleteTania
LOVE the sink!! And I would have done exactly the same thing with the light bar.
ReplyDeleteWOW! I love the vanity, and I would have pretended like you that everything was going ok...because in the end it always works out the way it's supposed to...that's how I roll too! ;) Love the distressing and love the sink and tap - good job on $80.00! ;)
ReplyDeleteLove the light painted too!
Wow, what a difference! I love the chippy dresser! Great job. Thanks so much for sharing at Vintage Inspiration Party.
ReplyDeleteWow. that is incredibly creative. What a detailed remodelling job! Thank you for linking them up at the SHARE IT linky party last week. A new party will open again later today. So hope you can make it?! ~ Rose
ReplyDeleteThanks so much Rose!
DeleteTania